The satisfying thwack of a perfectly strung tennis racket is music to any player's ears. But achieving that perfect sound and optimal performance requires more than just slapping some strings on a frame. Racket stringing is a nuanced skill, a blend of art and science, that significantly impacts your game. From choosing the right strings and tension to mastering the intricate process of stringing itself, there's a wealth of knowledge to unlock to truly optimize your equipment. Understanding these elements can mean the difference between a comfortable, powerful swing and a frustrating, injury-prone experience.
This comprehensive guide will delve into every aspect of mastering tennis racket stringing, from selecting the appropriate materials and tools to understanding the mechanics of string pattern and tension. We'll cover everything from basic principles to advanced techniques, ensuring you develop the confidence and expertise to string your own rackets like a pro. Ready to learn the step-by-step process and elevate your game? Let's begin!
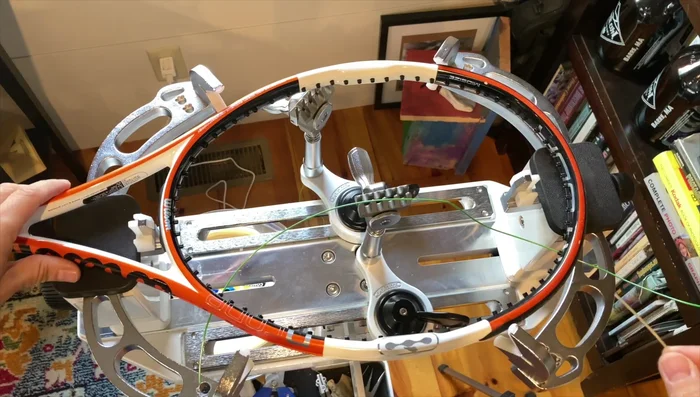
Preparation and Safety Guidelines
- Tennis Racket
- Stringing Machine (e.g., Torne 300 CS Extreme)
- Tennis Strings (Synthetic Gut/Nylon and Polyester)
- Stringing Tools
- Always wear safety glasses to protect your eyes from flying strings or broken string pieces.
- Use caution when working with the stringing machine's clamps to avoid pinching or injuring your fingers.
- Never attempt to string a racket without proper training and the right equipment. Improper stringing can damage the racket and cause injury.
Step-by-Step Instructions
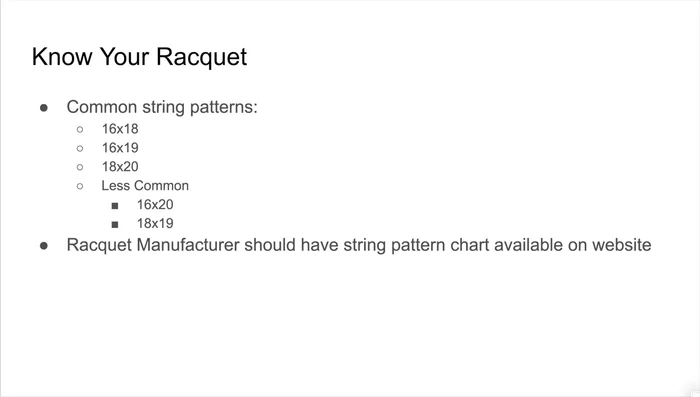
Understanding the Racket's String Pattern
- Identify the number of mains and crosses (e.g., 16x18, 16x19, 18x20). Consult the racket manufacturer's website or the racket itself for this information. ClipperUSA.com is a great resource for older rackets.

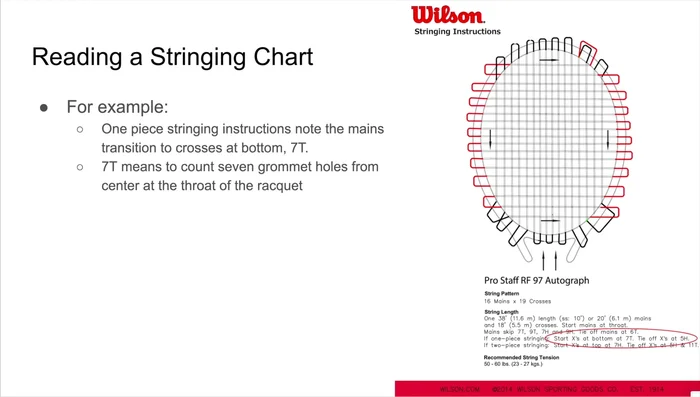
Understanding the Racket's String Pattern Interpreting the Stringing Chart
- Locate the manufacturer's stringing pattern chart. This chart details the string length needed (one-piece or two-piece), grommet hole numbering (H for head, T for throat), and the sequence for stringing mains and crosses.
Interpreting the Stringing Chart Preparing the Racket for Stringing
- Mount the racket securely and level on the stringing machine. Use all available clamping points (typically six for high-end machines, two for basic ones) to ensure stability.
Stringing the Mains
- Follow the chart's instructions, stringing the mains symmetrically (two-piece) or strategically (one-piece). Pay close attention to where the mains transition to the crosses.
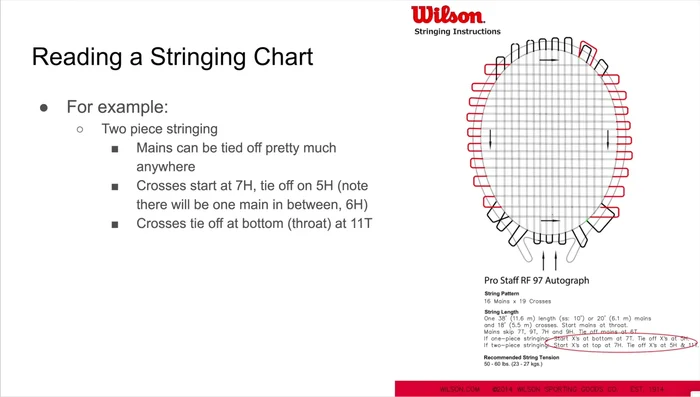
Stringing the Mains Stringing the Crosses
- Weave the crosses, following the pattern chart's guidance. Note the starting and ending points for the crosses at the head and throat.
Stringing the Crosses Securing the Strings
- Securely tie off both mains and crosses at the designated grommet holes. For the final tie-off, consider the string type; synthetic gut is easier to weave but harder to tie off tightly, while polyester is the opposite.
Securing the Strings
Read more: Master Tennis Racket Stringing: The Fastest & Easiest Cross Stringing Technique
Tips
- String Selection: Synthetic gut (nylon) is easier to weave but harder to tie off tightly; polyester is more rigid, making weaving challenging but tie-off easier.
- One-Piece vs. Two-Piece Stringing: Two-piece is generally easier for beginners, while one-piece requires more precise string length management.
- Grommet Hole Counting: Accurately count grommet holes from the center main at the head (H) and throat (T). Do not skip any holes.
- Racket Leveling: Ensure the racket is perfectly level on the stringing machine for even tension. Use all clamping points for better stability.
- Tension: Clamp the racket snugly but not too tightly to avoid frame damage.